So you have received your awesome, new xTool F1 and can’t wait to get started. Once you have the machine unpacked and sitting on your work table, you need to connect it to your computer so that you can connect the machine to Creative Space or Lightburn.
Lightburn is our preferred software for our laser machines. This tutorial is solely aimed at connecting your machine to Lightburn.

The first thing we need to do is come to the side of the xTool F1 and insert the USB cable that is provided with the machine.

Then you insert the other end of the USB cable into your computer.
And of course, you need to turn your xTool F1 to the ON position.

Open Lightburn on your computer. Lightburn has a 14 day free trial period and after that you will need to purchase a subscription if you wish to continue using it. We find it so easy to use that we have purchased a subscription. Again this is a Lightburn tutorial so I won’t be going into any of the other software packages at this point.
Once you have opened Lightburn on your computer. Click on the ‘Devices’ option from the menu on the right hand side of the screen.

This will show a list of the devices that you have previously connected to Lightburn. As you can see the xTool F1 is not showing in the list. So we need to add it to the list. To do this we need to :-
- Download a file from the xTool website.
Now back to Lightburn.
Click on the ‘Import’ icon

Clicking on the import option will open the files on your computer.
Click on the file that you downloaded from xTool.

When you click on the file it will automatically load all the necessary files you need to add your xTool F1 into Lightburn.
You can see that it has now been added to my list of laser machines.

Click on the ‘OK’ button

Come over to the dropdown as shown below and select your xTool F1 from the list. If you only have the xTool F1 that will be the only laser machine name showing. If like us, you have a number of machines you will just scroll down to the xTool F1.

Once you have selected your xTool laser, you will see that the grid in Lightburn now matches the dimensions required for the xTool F1.

So let’s continue on and do some engraving and cutting.
I’m just adding my working plate to the base of the F1. This is just to protect the bottom plate surface when I’m cutting.

For this example I am using a piece of 3mm paulownia wood, and I have just set it on top of the working plate.
You will notice the two dots that are showing on the wood. We need to merge the dots so that they are on top of each other.

To do this we come to the side of the machine and turn the large button.

Keep turning the knob until the red and the blue dots are merged together.

Now you can import an image, but I am going to create an oval by selecting the ellipse shape icon on the left hand menu.
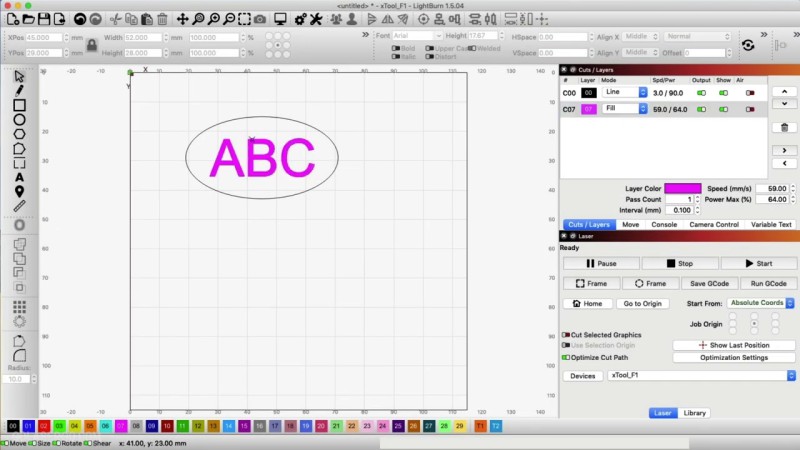
I have dragged out the shape so that it is large enough for me to insert some text.

You will notice that this has created a layer in the Cuts/Layers Panel.

Next I am going to create some text by coming over to the ‘Text’ icon in the left hand menu.

This has placed both the text and the oval into the same layer. We don’t want that as we want the text to engrave and the oval to cut.
So we need to select the text and come down to colours at the bottom of the screen and give the text a new colour.

What this does is create a new line in the Cuts/Layer panel.

I’m going to move the text so that it sits inside the oval and center it.
Then I select the layer for the text and change it to FILL. This will now engrave the letters instead of cutting them. You will notice that the letters are now filled with color.
If your letters don’t fill with color and are still showing as an outline, come up to ‘Settings’.

Turn on the ‘Filled Rendering’ option and click OK.

Now we need to set the speed and power for the material that we are using.
So we come over to the xTool website to get the (aff link). Please note that these settings are for xTool Creative Space so it pays to do a test with your material before committing to a final project.
Select ‘xTool F1’ and the type of material you will be using to get the correct settings. I am using paulownia wood so I have selected the Basewood 3mm option.

Take note of the power/speed and pass settings fro both the Vector Cut and Vector Engrave options as we need to enter these into Lightburn.

Note: The settings on the xTool website are in mm per second so we need to take that into account in Lightburn.

To make sure you are using MM/SEC to into Lightburn, select the ‘Settings’ option and change the the setting to mm/sec and click OK.

Another thing you will notice in the Materials Table is that xTool recommend using the blue light laser for this material.
Lightburn defaults to Blue Light so we don’t have to make any changes to that for this project.
However, if there comes a time when you are using a material that requires a Red Light laser, come over to the ‘Console’ tab and select ‘Red Laser option.

Now it’ s time to enter my settings for each layer. So I double-click the LINE layer and enter the speed and power recommended by xTool, and press OK

Now select the FILL layer and enter the settings for the engraving, and press OK.

Once all the settings are entered, press frame to see where the image is going to be on the material. This allows me to make adjustments and move the material to where I want the design to be.

Once I am happy with the placement, I click START. You will notice that I have moved the piece of wood so that the design is in the top left hand corner. This is simply to reduce the amount of waste.

So the settings worked well for this project.
The F1 engraved and cut out the design perfectly.

I tried Lightburn on my Xtool F1 a few days ago:
1) There were NO layer colors at the bottom of the computer screen.
2) The “frame” function didn’t work at all.
Not sure what is going on there. Are you using the latest version of Lightburn?
Hello I went to X Tool to find the material speed and feed list and I cannot find it anywhere could you please send me a link where I can find it.
Here’s the link Phil – https://www.xtool.com/pages/material-settings